Thursday, July 21, 2016

On Repeat

by Linda


Taking a picture everyday is good practise. It helps us become better photographers in many ways. We all know this. Whether or not you are officially in a "365" group, just a photo (or more!) a day not only helps us to see the world around us in new ways but lets us capture everyday moments to reflect back on. I enjoy looking back through previous "365" photos and even though I am not officially part of a "365", I still take a photo a day.


The problem becomes, how to keep the pictures fresh. How do I take pictures of different things even if I am in the same place day after day. How many pictures of the same thing can I stand? But maybe this is not really a problem after all.


Because I do take a picture of the same thing. Everyday. And when I look at them, I discover they are not the same at all.


I always have my phone with me as I walk each (almost) morning and I take mostly the same route each time. I do have a few favorite vantage points that I always look at more intently as I pass.


Each time, something catches my eye. Each time something is different about the locations. Similar but different and never to be the same again.


So, why not take the same picture again and again? It's never the same. There is always something different about it. Something magic about each place.
...
The way I see things..

something is always different, something has changed, whether it is the place or it is me

appreciating the difference in each shot takes a moment, a moment to remember being there, to feel it, smell it be a part of it again, it's a moment of time captured forever

and there's nothing wrong with that
...

How about you? Are you on repeat? Do you take the same picture over and over? Don't you love it?

...

about my pictures-
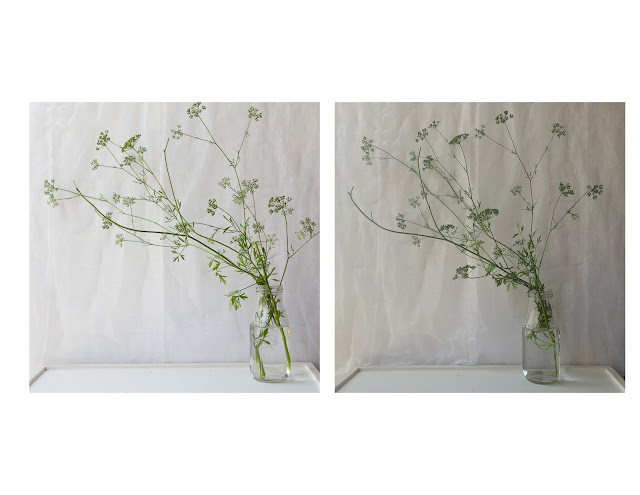
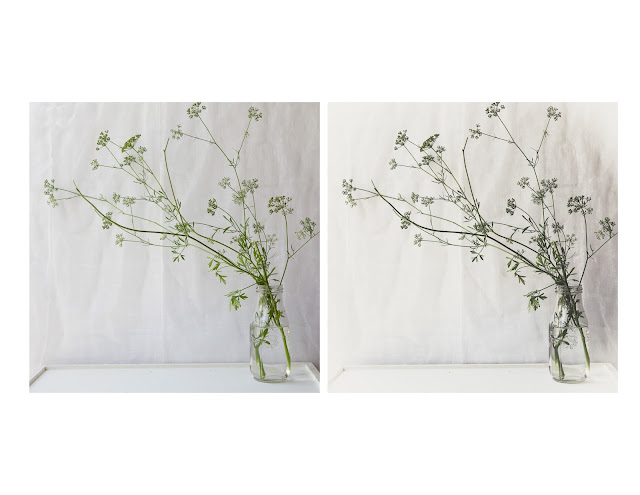
first 3 were taken at one location, different days
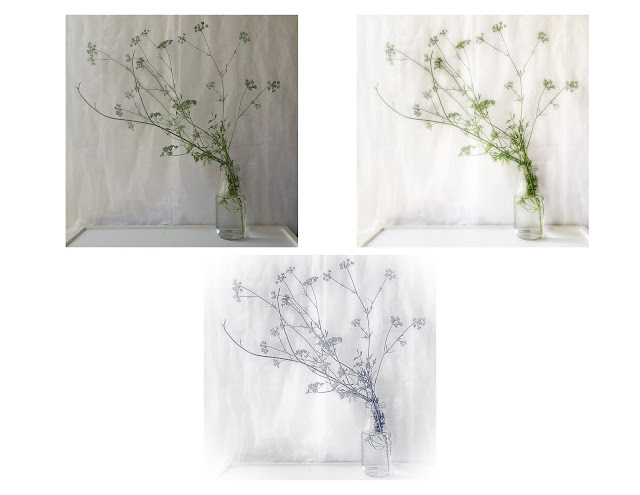
second three were taken at another location, different days

...

"Photography records the gamut of feelings written on the human face, the beauty of the earth that man has inherited, and the wealth and confusion man has created. It is a major force in explaining man to man"
~Edward Steichen

...


Thursday, September 3, 2015

Parsley - 2 Ways


by Linda

Wasn't August Break nice! I enjoyed taking some time to breathe in the last of summer and enjoy the days. The start of a new school year always feels like a new beginning. New routines and new friends. My morning walks take me past an elementary school and I walked slowly by on the first day so I could watch all the children with their new shoes and new backpacks getting ready to start a new school year with big smiles, great anticipation and probably a few butterflies! The air around the school was just electric that morning!
 
As I took time to think about my photography journey and wonder about what is in store, I remembered that something I enjoy doing, and is really a lot of fun to me (like playing), is to take a picture of the same thing with my DSLR and my phone and then edit each one, then compare them.
 
I am one of the few people that edit DSLR pictures on my computer and phone pictures on my phone. Call me crazy old fashioned. So that is how these pictures were edited, respectively.
 
Today, I'm showing you the parsley I photographed with my DSLR and edited with Lightroom and the same parsley I photographed with my phone and edited in Snapseed and Phototoaster.
 
Can you tell which one was taken with a DSLR and which one was taken with a phone?
 
How about if I show you what they looked like before they were edited.
 
Did that help?
 
Take a look at the top diptych and this one just above. Decide which one you think is DSLR and which one is phone. I'll give you 10 seconds (more time than Usain Bolt needs to run 100 meters)
 
Ready? 1-mississippi 2-mississippi 3-mississippi 4-mississippi 5-mississippi 6-mississippi......
 
World record!
 
What did you decide?
 
If you guessed the picture on the left is the DSLR and the picture on the right is phone, go to the head of the class! Winner winner chicken dinner!
 
Here's the DSLR SOOC/edited side-by-side comparison -
Gently edited with Lightroom, auto tone, kk_still preset, slight vignette
 
 
Here's the phone, actually 2 different apps so 3 pictures-SOOC/app/app
top left-SOOC,
top right Snapseed-HDR, Glamor glow, minor Tune Image (prbly an ambience adjustment),
bottom Phototoaster-Silver Light Preset
 
Easy peasy but always fun.
 
Have you done any two-fisted shooting?
 
Share it with us in the gallery! Another way to use a diptych (or tryptich!)
 
...


Thursday, July 9, 2015

iPhoneography Silhouette

by Linda


"Delusional"
 
iPhone photo taken with Hipstamatic (Salvador84/Black keys extra fine)
edited with Repix
...
 
Taking a silhouette shot with an phone camera can be difficult. That smart little camera wants everything to be as well lit as possible with every shot.
 
When taking a silhouette with my phone, I have had luck using Hipstamatic and through trial and error, selecting a lens film combo that gives me what I'm trying to achieve. For this shot, I wanted a silhouette with a double exposure. I positioned myself in front of a bright window and shot away until I got what I was looking for.
 
In Repix I added all the big and little bubbles and birds as well as adjusted the overall tone of the picture.
 
...
 
Silhouettes can be very mysterious or evoke different emotions which is what I love about them. Taking a silhouette through one or two different apps can add just that much more to the shot!
 
Try it sometime! It's a lot of fun!
 
...


Thursday, March 19, 2015

When Size Matters

by Linda


Printing our pictures is one of the more satisfying parts of this whole photographic experience. Whether you are scrapbooking, framing, selling or giving, holding the pictures in your hands and viewing them in the real world and not just on the computer can give you a sense of pride and accomplishment in what you have created. And I hope you are printing them. Even the ones on your phone.

The little cameras on our phones have come a long way. The one on my current phone takes pictures with amazing clarity. We all know how important image size is when it comes time to print our pictures and sometimes you might wonder if the pictures on your phone are big enough to print clearly. They probably are in most cases, unless you cropped it or used an app that degrades the pixels.

It's easy to see how cropping will reduce pixels, you chopped them off! There are some apps that will degrade the pixels of your picture just by adding the effect that you went there for in the first place, whether you crop it or not. You take a perfectly good picture and you want to run it through a favorite app and that favorite app will spit out a reduced pixel image. Why is that? I have no idea! (if you do please explain this to us in the comments)

So how do you know if your picture is big enough? There is a handy app called "Photosize" that will tell you. (for iPhone) It's sole purpose in life is for you to put a picture in it and it will tell you how many pixels wide and how many pixels tall and what the total pixels are.  That's all it does. After it has shown you the pixels of that picture, it simply asks for another.


This is useful information, but what do you do if you have a picture that is too small? One way I resize/resample a picture is with another app called "Filterstorm". (for iPhone, coming soon to Android) This is a good app with a lot of other uses, when saving a picture you get the option to tell it what size to save the picture and at what resolution. (try Photo Resizer for Android)

I cropped the above picture to show the pixel degradation from the cropping then I ran it through Filterstorm and show the resize/resample size.


After cropping -


You can see the total pixels are reduced by more than half.


After resizing/resampling in Filterstorm, there are mega pixels! Over achiever! I input 3000 pixels wide and 3000 pixels tall which is bigger than the actual image and I input maximum image quality so that is why I got so many pixels.

If you're interested in converting total pixels to megabytes, there are way too many variables to explain, compression ratios, ppi's, calibrations, whether it's Tuesday and so on, so rather than give you a headache, let me just say, try to save your pictures at the highest resolution possible. If you have to resize/resample, start with width and height of 3000 pixels each. This way you will be sure to get your pictures printed at the size you want, and they will look mah-velous!

...


Friday, October 31, 2014

I Get It

by Deanna


OK, I must hang my head in shame and ask forgiveness for all the times I watched you take your Phone pics and thought WHY?  Why do you take pictures with your phone instead of using that expensive camera and lenses that you have invested in.  Why??  Ofcourse that was when I had an I-Phone 4, and personally I thought the camera sucked and there was no way I was going to to choose a phone over my beloved big girl camera.  She went with me everywhere, sitting in the front seat of the car, or stuffed into a large bag, or simply strapped to my body so I was ready to grab that unexpected photo op.


Then as I was gathering all my stuff for our FOL trip to Galveston,( you know about that incredible time we spent together, if not just read the last 2 weeks of our posts and you will get an idea of just what a grand time we had together) I thought about my old phone, that I had never upgraded and how I would be surrounded by 9 women taking, not just camera shots, but phone shots. I decided I didn't want to be on the "outs" any longer. And since  I was due for an upgrade (you think??) off I went to the Verizon store without hesitation, knowing that I could depend upon my FOL sisters to guide me back into phonography, advising me which apps to use, how to's, etc.


It wasn't too long, I admit, that I have become quite addicted to this new way of seeing thru the lens of an I-Phone, trying to compose, tilting the camera to avoid glare, using the myriad choices of Apps to enhance the shots, having a camera that captures landscapes as well as macros, and rests quite nicely in my pocket. (note to self, always buy clothes with pockets)


So yes, I always have my phone with me, yes I am back on "instagram", yes I now gasp at some of the beauty I have seen on our "instagram" feed.  Sometimes it just takes me awhile to "get it".

PS All photos taken with my I-Phone 6.

Wednesday, July 24, 2013

What Have I Gotten Myself Into?!?

by Leigh


Ever have one of those moments when you've agreed to do something, but then you start to wonder, what have I gotten myself into?!?  I'm having one of those moments.  I am teaching a kid's iphoneography class this weekend called "Kids Who Click"  I'm really excited about it, but very nervous at the same time!
I have so many ideas of what I want to teach them but they are all jumbled up in my head at the moment.  I need to get more organized and lay out a lesson plan of some sort. Unfortunately funneling my ideas into a cohesive plan is not one of my strong suits! Perhaps you all can help me.  Can I bounce some ideas of you wonderful FOL'ers?

 The class is only 2 hours long.  So I have it divided into three sections: SHOOT, EDIT and SHARE. 
  • SHOOT-tips for using the phone camera, looking for good light, composition and focus
    • I have a scavenger hunt planned to give them ideas of what to shoot.  (Birds eye view, from where I stand, hearts, self portrait, abstract, patterns, worms eye view)
    • Still life vignettes will be set up as well as props such as sidewalk chalk, bubbles and flowers. 
  • EDIT-using Snapseed and Afterlight we will go over some basic editing techniques
  • SHARE-using Instagram (etiquette, hashtags and comments) and ways to print your photos (canvas, metal, books, prints)
The part that I'm struggling with is how to show them the editing apps.  I've made sure to tell the parents to have the apps on their (fully charged) phones and ipads before they come to class.  But there is no way that 16 kids can crowd around me and my little iphone to watch me edit.  Someone suggested taking screen shots and then put together a slide show on my laptop with a projector.  Anyone have any other ideas?

I am putting together these little cheat sheets books for the kids to take with them.  One sheet will be  general iphoneography tips & tricks, one sheet for Snapseed, one for Afterlight, one for Instagram, one with my favorite apps, one with ways to print and one with prompt ideas.

I just know that these kids are going to blow me away with their creativity and I look forward to sharing some of their photos with you next time I'm up at FOL.  You can also follow along on Instagram with the hashtag #kidswhoclick

I'm hoping that the kids realize that sharing their photos is not about how many *likes* they can get or who is giving them shout outs.  It's about expressing their creativity and learning from others.

Wish me luck! and if you have any suggestions please please please send them my way either by comment here on the blog or by email design@leighlove.com


Thursday, June 27, 2013

Edit Challenge Wrap-up

 by Linda


I want to thank everyone who participated in the edit challenge I posted about last time I was here. I felt like a kid in a candy store every time I saw another beautifully and creatively edited photo! I hope you had as much fun as I did!

I want to share some of the edits and the recipes today. These are not all of them, just a few so if you would like to see more stop by the flickr gallery and the Instagram gallery.

The original photo above was taken on my iPhone one morning while out on my daily walk. I was experimenting with the native camera in HDR mode. I took lots of pictures of different things. This is one that was just ok, not great. My "no delete" policy allows me to use these kinds of pictures to experiment with new and different processing techniques and apps. That is exactly what I did with this photo and what I asked you to do with it too!

From flickr:


This edit is by drolwa
Barbara says "..I think I used the watercolor app Aquarella as well as the Snapseed app and sharpened the image in Aviary"

I like the vintage look of this. The texture in the center of the image looks like a torn or worn photograph.


another creative edit by drolwa


PicMonkey was used on this one

Another vintage feel with this one but with color. The tones are distressed and worn. The texture used here is a nice addition to the sky.


This edit is by *jdarby*

Janice says "I used two photo filters, blue and orange, added a curves adjustment.
for fun, I added a rainbow, rain, butterfly and extra bokeh"

I liked the coolness of this edit. The beautiful blue sky with a light morning shower caught my eye. Of course I do love bokeh! You can never have too much bokeh.

From Instagram:

This edit is by @karenmarie63 
apps used are PicTapGo, Mextures and DistressedFX

I liked the colors and the painterly look in this one. The grasses really stand out and are such a beautiful golden color.


This edit is by @echie52
apps used are Alt Photo, PicFX, Phototoaster and Filter Mania 2

I like the faded vintage feel of this one.  The birds flying around in what could be fog rolling in is a very nice creative touch.


This edit is by @adnahss
processed for color and contrast with Picsplay, apps used are TangledFX, iColorama and DistressedFX
  
I like how the area around the sun is blue but the sky is red! The birds look as if they are flying away from the sun.

This edit is by @nicedreamwithu
apps used are Superimpose, MasterFX, Juxtaposer, Color Effects and PicTapGo

Donna says "I love playing with colors and blending textures. I use layer upon layer in all of my edits."

I was drawn in by this edit. Knowing what the original looked like and seeing what she did kept me looking and looking. I like the colors and clouds and sparkles and the hot air balloons were unexpected and lovely!  Donna's photo stream on Instagram is beautiful and filled with creative edits like this.


This is a first edit from me. I had just downloaded a new app called Mextures and wanted to see what it could do.

My recipe in Mextures was:
Landscape Enhance-Summer Setting
Lite Leaks-Viva La Grunge
Emulsion-Jefferson


My next edit was with DistressedFX
My recipe:
Lily-increased effect and saturation
Charm-increased effect and saturation, decreased brightness


This was my most fun edit. Me in a bubble! Weird stuff! But so much fun!

My recipe:
Juxtaposer-put me in the picture
Elasticam-stretch my arms, dress, hair
Alien lens-add bright sun where the sun was in the center of what is now me to make it brighter since I covered it up with myself, add Alien Lights (the big circle thing around me), add Star Fade and Star Group to the sky, apply Warm Filter
DistressedFX-Egret and Charm

...

Thank you again, for playing along with this edit challenge! I enjoyed seeing your edits and I learned a few new tricks!

Stop by the photostreams of the artists featured here and spread a little love on their creativity! Follow a new person on Instagram or flickr! All of the usernames below the photos are clickable and that will take you to either their flickr stream or the web version of their Instagram stream. 

What did you think?

Should we do this again?


Wednesday, April 10, 2013

iPhoneography - Part 4, App Stacking

By Carol H.

Your participation in the discussion of mobile photography during this series has been awesome! Many thanks for taking the time to stop by FOL and for sharing your favorite apps with everyone. Did you miss part 3? You can find it HERE. In the meantime…

App Stacking (also known as Apping) is where more than one app was used to process an image. When thoughtfully applied, this process can yield incredible results, and all from your mobile phone. 

In this segment of the series, I'll share some things you might want to consider when app-stacking along with a few of my recipes for images I have done. So let's get started!


Recipe for the above: Original image into Touch Retouch app to remove switch plate, save. Retouched image into Haiku app, save. Retouched image added to Blender app as base image & Haiku image added to Blender as top layer & wiped Haiku effect from clock face using Blender's masking tool.


Image size – It is important to keep track of your image size as you take it through different apps. After all your work, if you end up with an image that’s only 450k, you won’t be able to do much with it except share it on IG (Instagram.) There’s an app called Lab that can provide you with info about the size of your image.


Recipe for above: Original image into Haiku, save. Haiku image into distressed effects, save. Original image into Blender as base image and Haiku image into Blender as top layer, blending & masking as desired. While still in Blender, flatten image, then add Distressed FX image as top layer, blend & mask as desired.


Set your base image first. If you want your final image cropped, lightened, sharpened, etc., do this first so that you are starting with an optimum image to work with.

Recipe: Original image into Tangled FX and used "fibers smooth" preset, save. Original image into Tangled FX and used "brush strokes" preset, save. "Fibers smooth" image into Blender as base image and "brush strokes" preset into Blender as top layer, then blended and masked, save. Brought Blender image into Distressed FX, save. Brought Distressed FX image into Blender as base image and a jpeg file of birds flying as top layer, save.


Take notes. Without a history or layers palette to refer to, it can be difficult to remember all the steps you took to create your amazing image. You may have created something you will want to duplicate on other images for your own signature style.
Recipe: Original image into MarbleCam, save. Original image into Blender as base image and a picture of a hand in Blender as top layer, blend, then flatten. Marbled image into Blender as top layer and using the adjust & masking tools, place the marble into the hand, save. Open Blender image in Lens Light and add highlight to the marble.

Delete! If you don’t like your end result, don’t feel bad about deleting it. Though you may not like the end result, going through the process refines your skill with your apps. Playtime is never a waste of time!

Do you use more than one app to process your images? What are your favorite combinations? Leave a comment to let us know and show us your wonderful creations on the Focusing OnLife Flickr group or on Instagram and tag #focusingonlife.


The 5th and final installment of iPhoneography, Sharing, other fun apps to explore, and continued education, will be posted on 4/24/13.


© Focusing On Life